
The USG FLEX H Series is powered by the new uOS platform, designed to deliver higher performance, stronger security, and long-term scalability. Before migrating, please take a look at the features you currently use on your existing device and make sure they are also available on the H Series, as some functionality may differ.
In Nebula, these devices are configured with a clean and optimized setup, free from legacy settings or unnecessary complexity. This approach ensures stability, simplifies future management, and takes full advantage of the modern architecture.
In this article, we show you the best way to replace your existing USG FLEX/ATP firewall in Nebula with a USG FLEX H, so that:
Your site remains operational with minimal downtime.
Access points and switches stay in Nebula with historical monitoring data preserved.
You benefit from advanced performance, cloud-native security features, and seamless scalability of the H Series.
Your infrastructure remains consistent, future-proof, and easier to manage.
This guide focuses specifically on the Nebula scenario — replacing and re-registering the firewall in Nebula, while APs and switches continue to operate without interruption.
Step 1: Create a Backup Site on NCC
In the Nebula Control Center (NCC), create a new site by cloning the settings from your existing ZLD site.
Why this is important:
This ensures you have a backup of the configuration, allowing you to quickly restore the original settings in case of unexpected issues and avoid network downtime.
Action:
From the site list, select “Create Site”, then enter a site name and choose “Replicate from” to copy the current site.
Step 2: Prepare the H Series Firewall
Upgrade Firmware
Use the initial setup wizard to upgrade the firmware to the latest version (uOS v1.35 or higher). Keeping the device updated ensures stability and access to the latest features.Connect Locally
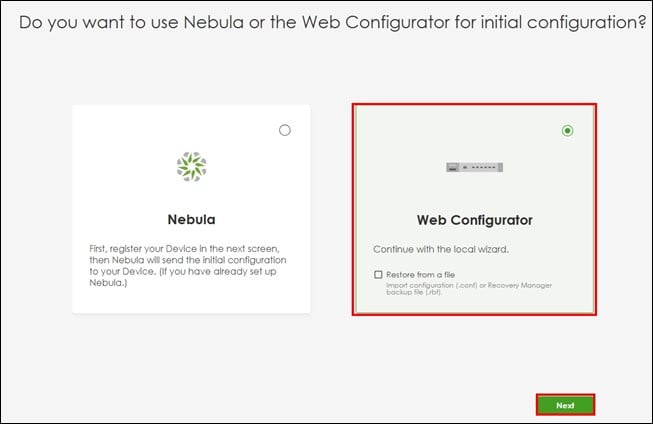
After the upgrade, disconnect the WAN cable. Connect a PC directly to a LAN port of the H Series firewall, open a web browser, and log in. The initial setup wizard will appear again.Enter Web Configurator Mode
In the wizard, select “Web Configurator”, then click “Next” to continue.Configure Basic Settings
Configure the Internet settings and system time settings, then click “Exit” to skip device Registration in Step 3.
Important:
To take full advantage of advanced features in Nebula with the USG FLEX H Series, your organization must have an active Nebula Pro Pack license.
Why this is important:
These steps make sure your H Series firewall is running the latest software and is ready for configuration before being introduced into your production network.
 |  |
Step 3: Configure and Back Up the Firewall
Configure Locally
Before registering the new firewall in Nebula, you must first complete all necessary configurations through the local web interface of the USG FLEX H Series. This includes applying the same design, policies, and any custom settings currently in use on your existing firewall. Make sure to replicate all features and adjustments required for your site’s operation.
Back Up Configuration
After configuration is complete, create a backup of the settings.
Navigate to the Maintenance page.
Select “startup-config.conf”.
Click “Download” to save the file to your PC.
Why this is important:
Having a local backup ensures you can quickly restore the firewall’s configuration if adjustments are needed or in case of unexpected issues during the migration.
Step 4: Replace the Old Firewall and Register the New One
Replace the Old Firewall
Disconnect all cables from the old firewall.
Reconnect them to the corresponding ports on the USG FLEX H Series firewall.
Verify that the network is functioning properly.
Note: If any network issues occur, reconnect the old firewall to restore connectivity and review the configuration before retrying.
Remove the Existing Firewall from Org and Register the New One in Nebula
In the Nebula portal, remove the old firewall (USG FLEX, ATP, or NSG) from the existing site.
Navigate to Organization-wide > License & Inventory.
Go to the Devices tab.
Click the Action button and select “Remove from the organization.”
Confirm by clicking “Yes.”
(After this, the old firewall is removed from the organisation.)
Register the new USG FLEX H Series firewall in Nebula:
Click the “Add” button.
Enter the serial number and MAC address, then click “Next.”
Click “Finish” to complete registration
3. Assign the firewall to the correct site:
Find the newly registered firewall in the device list.
Click the Actions button and select “Change Site Assignment.”
Choose the original site and click “Save.”
When the warning message appears, tick “Acknowledge” and click “OK.”
Allow Cloud Synchronization
Once the H Series firewall connects to the Internet and reaches Nebula, it will automatically initiate a full configuration sync with the Nebula cloud.
Verify Status in Nebula
Go to the device detail page in Nebula.
Confirm the firewall shows as Online.
Wait until the Configuration Status displays “Up to date.”
Comments
0 commentsPlease sign in to leave a comment.